Transport Fever 3 Weather, Night and Game Settings: Climate, Seed and Difficulty
Transport Fever 3 has three fixed kinds of weather, Sunny, Cloudy, and Rainy, plus Dynamic, which changes the weather at random. The time of day can run as a cycle or stay fixed at Morning, Day, Evening, or Night: pick Day and there is no night. You set both when you create a map and can change them any time with the date controls in the bottom right corner; below are all the other new game settings too.
Last updated Game version: Release version, manual page revised 2026-09-29
The short answer
Weather: Sunny, Cloudy, Rainy, or Dynamic. Pick it when you set up a map, and change it any time with the date controls. Weather
No night if you pick Day. The time of day can be fixed as well, and changed again during the game. Night
Same seed, same settings, same map. Note the seed of a map you like. Seeds
The difficulty fills in every gameplay setting. You can change single settings afterwards. Gameplay settings
Weather, time of day and night
The Environment section sets the weather and the time of day the map starts with. Dynamic changes the weather at random. The fixed choices are Sunny, Cloudy, or Rainy.
Dynamic cycles between dawn and dusk.
Continuous runs through day and night in one steady loop.
Local Time is listed as a third option. The manual does not say what it does.
The fixed choices are Morning, Day, Evening, or Night.
To play without night, pick Day as a fixed time of day. You do not have to decide for good: during a game, the date controls in the bottom right corner, where the game speed controls are, change the calendar speed, the weather and the time of day, and with the Sandbox Mode mod the date itself. On a controller they are under Date settings in the radial menu.
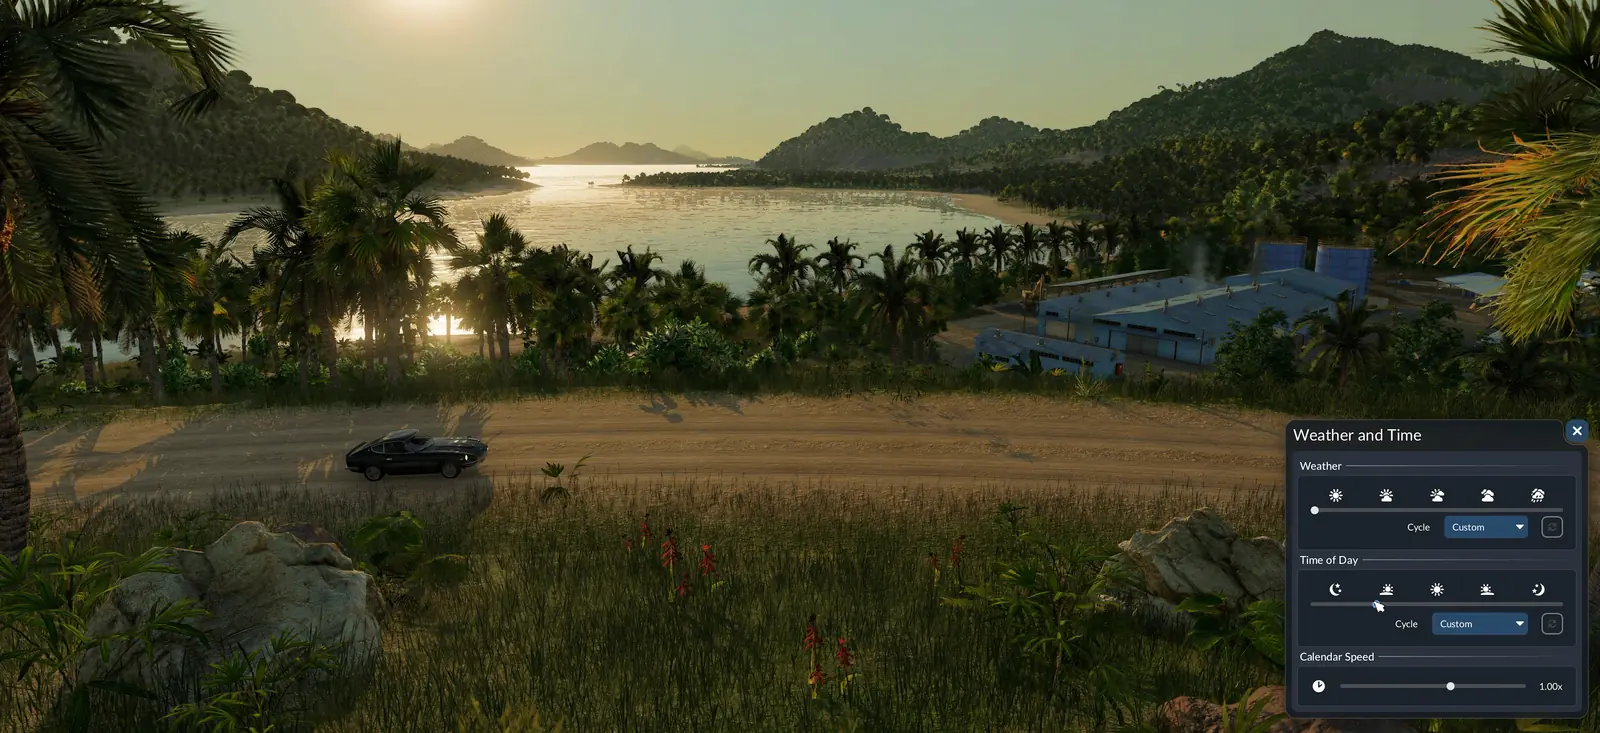
In the official screenshot at the top of this page, that window is called Weather and Time: it has a slider each for Weather, Time of Day, and Calendar Speed, and a Cycle menu under the first two (view it full size).
Weather and frame rate
Two players say the weather, and the changing light of sunsets and the day-night cycle, cost a lot of frame rate, and suggest fixing them: one set a fixed sunny day and got a steady 60 to 75 FPS at 4K, where rain used to bring big drops. (player reports: October 8, 2026, October 7, 2026; not official advice). More fixes players found for low frame rates are in the troubleshooting guide.
Two achievements come from these controls: Weatherman (change the weather) and Timekeeper (change the time of day). The achievements guide lists every achievement and how to get it.
The four steps of a new game
Choose New Game in the main menu. The game then walks you through a climate choice and three tabs:
Climate. Pick one of the four climates to generate a new map, or open a finished map from the Mod Hub or the map editor instead.
Settings. Map size and shape, the seed, the terrain sliders, town and industry density, the start year, weather, time of day and the tutorial.
Gameplay Settings. The difficulty level at the top, and the economy, town rating, finance and advanced settings it fills in.
Add Mods. Mods, the four that come with the game, and Deluxe Edition or Pre-Order Pack content. Start Game sits in the bottom right corner.
The four climates
The climate decides how the map looks and what its land is like. It does not change the simulation directly, but the land itself makes some kinds of transport more useful than others.
Climate
The land
Industries listed
Only in this climate
Temperate
Green grassland and forests, rivers and lakes, and taller mountains.
27
None
Subarctic
Big fjords, swampland and huge mountains.
27
Paper Mill and Printing Press
Dry
Deep canyons, flat-topped hills and sparse plants.
24
None
Tropical
Palm trees and other tropical plants almost everywhere, and the generator can make islands.
27
Rubber Farm and Tire Factory
The industry counts follow the industry table in the official manual. See every industry and cargo of a climate in the industries and cargo tool, or plan a whole chain in the production chain planner.
Map settings: size, seed and terrain
The World section of the Settings tab starts with Map Size and Map Format, the size and the shape of the map. The map sizes guide shows how big each one is and which work on console.
Seeds
The seed is the key for the random map generator: the same seed with the same settings creates the same map again. You find it in the World section of the map settings, next to Map Size and Map Format. To play a map someone else liked, you need their seed and also their climate and map settings.
Terrain sliders
Every climate has a terrain generator of its own, with its own sliders and options in the Terrain section. Mods can add more generators, each with its own options.
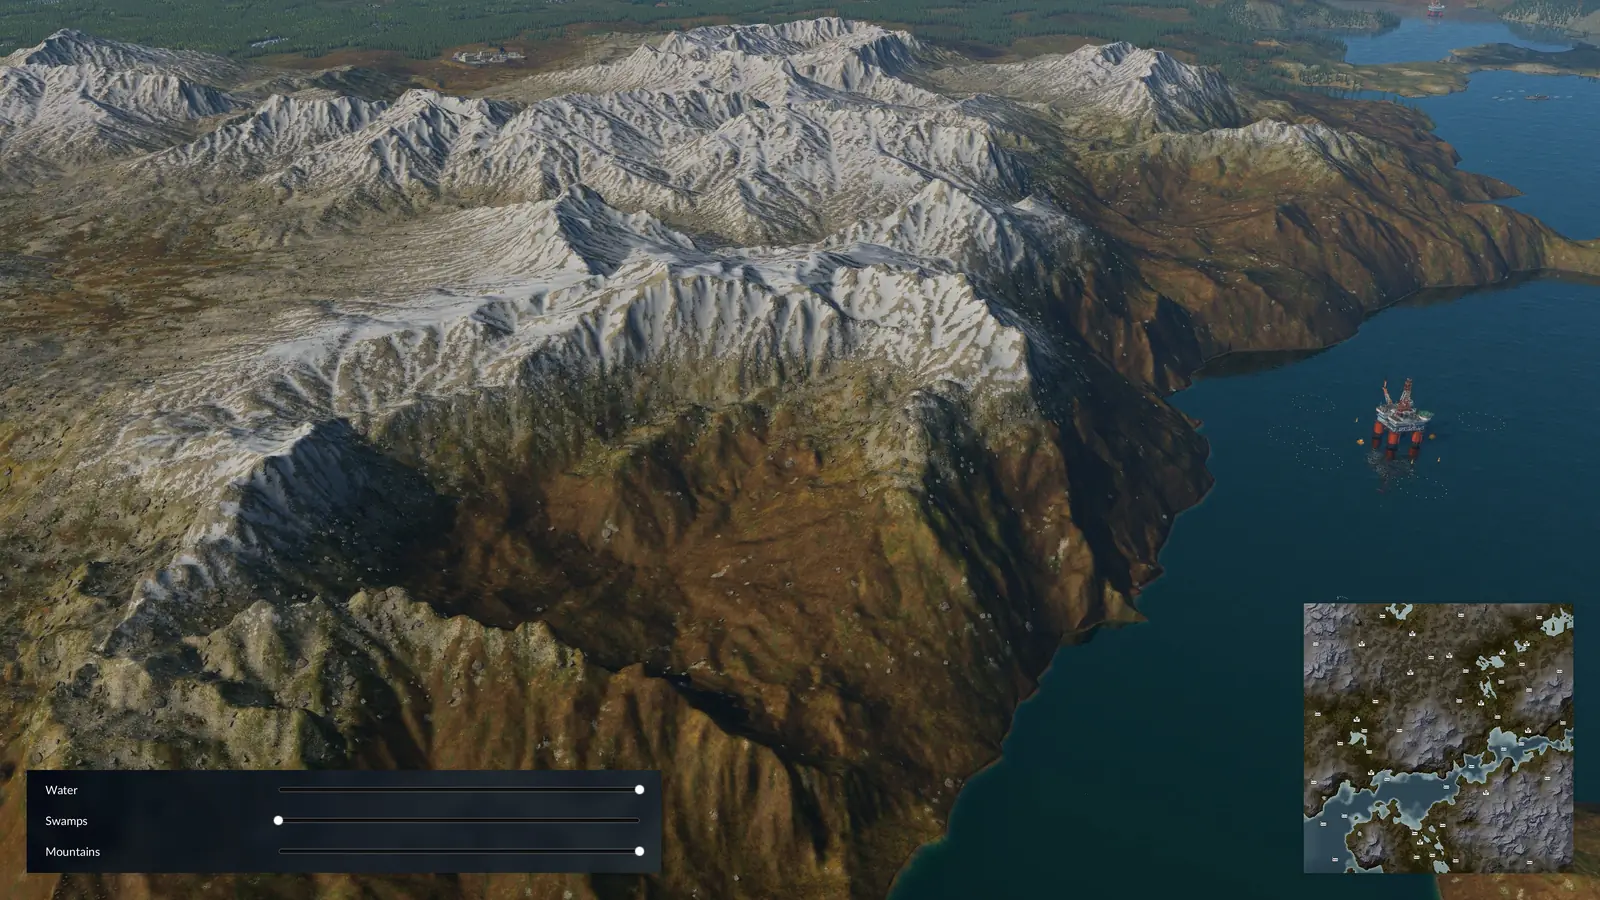
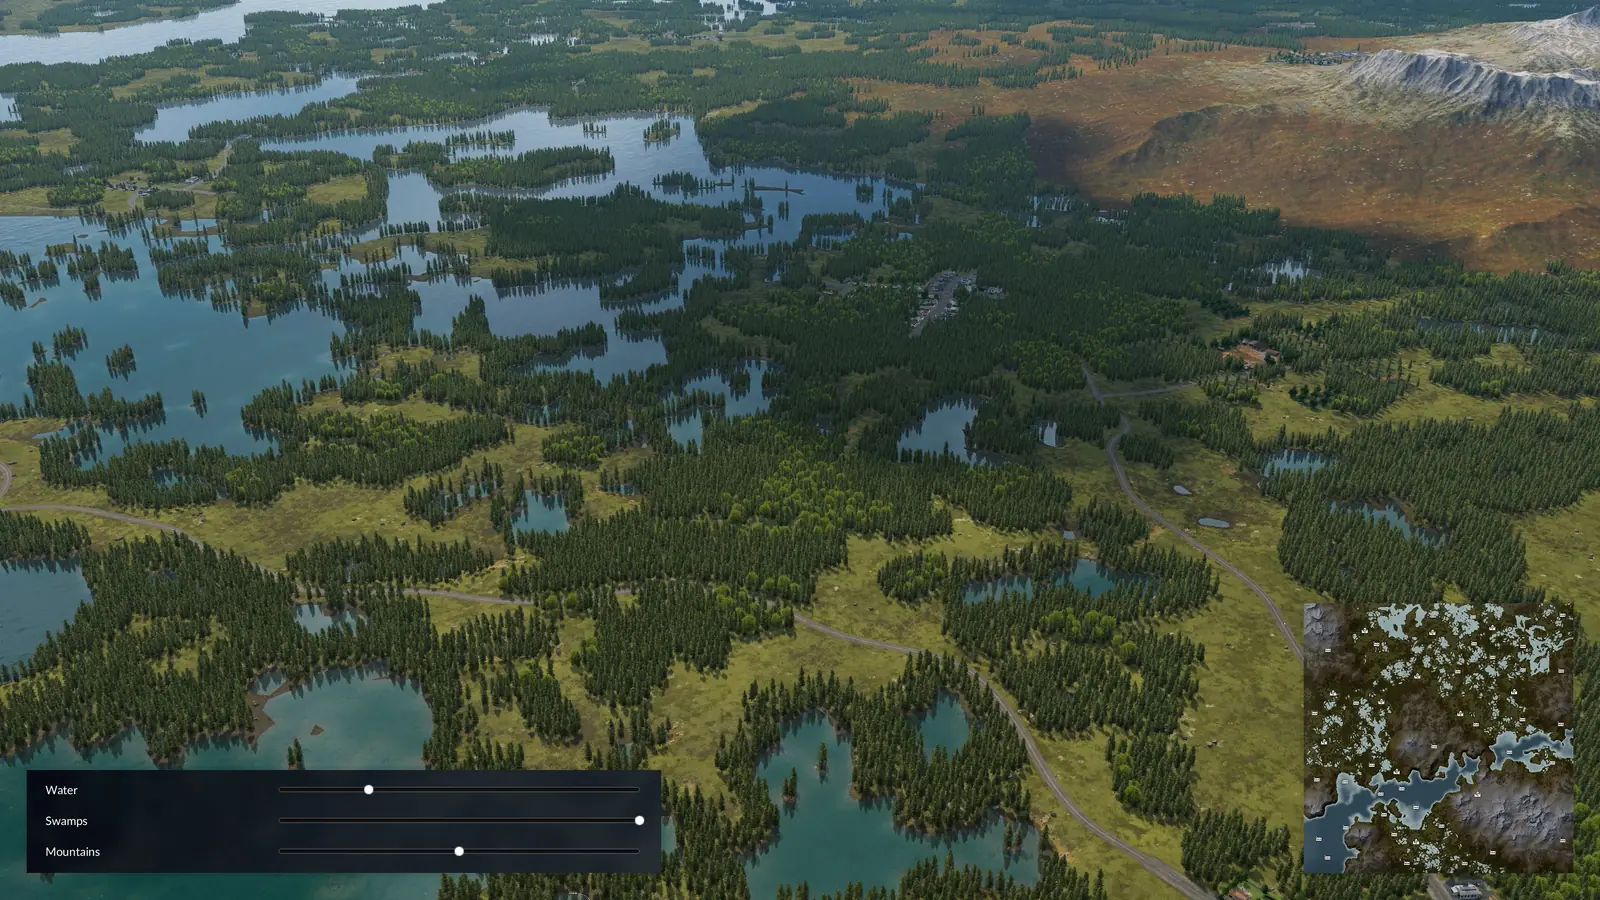
The press screenshots show three subarctic sliders: Water, Swamps, and Mountains. They were taken before release, so the release version may look different, and the manual does not list these details.
Towns, industries and the start year
Names picks the lists the game draws town, bus stop and resident names from. Mods can add more lists.
Towns Density sets how many towns there are. Low density starts you with fewer, slightly bigger towns; high density with more, smaller ones.
Industry Density sets how many industries the map starts with. At lower density each industry produces more. The town population also changes the count, because towns create demand, and more industries appear as the years pass.
Start Year goes from 1900 to 2020 in steps of 10 years. It decides which vehicles you can buy at first: see the vehicle unlock dates.
Tutorial turns the onboarding tutorial on or off. Urban Games suggests playing it once in your first game.
Difficulty and gameplay settings
The Difficulty level at the top of the Gameplay Settings tab fills in every setting below it with that level's preset values. After that you can still change single settings. Keep one rule in mind before you change anything: achievements are generally unavailable while non-cosmetic mods are active or when gameplay settings differ from the standard values.
Economy
Setting
What it changes
Industry Productivity
How much industries produce in a year: the higher it is, the more often they turn out cargo.
Industry Closing Frequency
How likely an unused industry is to be marked for closing. A marked industry closes if none of its output is delivered before a grace period runs out.
Industry Target Density
How many industries the map works towards over time. New industry types keep appearing over the years, so the count goes up anyway.
Vehicle Maintenance Effect
How much poor maintenance hurts older vehicles: more noise, pollution and running costs, less top speed, power and comfort. None switches the effect off.
Subsidies Availability
How often subsidy offers come up.
Subsidies Risk
How demanding subsidies are. Higher risk means more cargo to deliver, less time and a smaller payment up front.
Landmark Required Resources
How much cargo a landmark needs before it is built. With None, landmarks finish straight away.
Inflation
How inflation affects what cargo and passengers earn. With inflation on, income falls in step with your company rank.
Town Ratings
Setting
What it changes
Reputation
Turns the reputation rating on or off.
Traffic Sensitivity
How much congested roads hold towns back. Higher values make towns more sensitive.
Happiness Sensitivity
How much unhappy passengers hold towns back. Higher values make towns more sensitive.
Delivery Sensitivity
How much late cargo holds towns back. Higher values make towns more sensitive.
Noise Sensitivity
How much noise near homes holds towns back. Higher values make towns more sensitive.
Pollution Sensitivity
How much pollution holds towns back. Higher values make towns more sensitive.
What a new vehicle costs to buy, copies of your own vehicles included.
Vehicle Maintenance
What vehicles cost to keep running.
Infrastructure Costs
What tracks, roads, stations and other buildings cost to build.
Infrastructure Upkeep
What tracks, roads, stations and other buildings cost to keep.
In our vehicle database, prices and running costs are those at Normal difficulty, with Vehicle Costs and Vehicle Maintenance at 100%.
Advanced
Setting
What it changes
Industries
Which economy the map uses. Mods can add other economies.
Population
How many people live on the map. More people make the simulation run slower.
Passenger Income
A multiplier on everything passenger transport earns.
Cargo Income
A multiplier on everything cargo transport earns.
Reforestation
Whether forest you have bulldozed grows back.
The built-in mods
Mods are switched on when you set up a Free Game: its fourth and last step is a Mods page, where Add Mods lists the mods and the Deluxe Edition and Pre-Order Pack content you can activate. Four mods come with the game:
Vehicles: No End Year. Vehicles you can buy lose their end year: once a vehicle becomes available, it stays available.
Sandbox Mode. Edit your money, jump the calendar to any date, add or remove towns and industries, and change cargo demand and town size.
No Costs. Turns money off: everything is free and the balance shows as infinite.
Tycoon. Puts the company at the highest rank with every perk unlocked; nothing else changes.
None of the four is cosmetic, so with any of them active, achievements are generally unavailable. The mods and achievements guide covers mods from the Mod Hub as well.
Starting the game, and changing settings later
Start Game in the bottom right corner builds the map; Back in the top left corner returns to the climate choice. Big maps, and many towns and industries, take longer to generate.
For a game you already saved, open Load Game and use the settings icon on its card. If the save allows it, you can change its gameplay settings and its list of mods there.
What the official pages do not say
The names of the difficulty levels and the values each one sets: the manual only says that picking a level fills in the settings.
What the Local Time option for the time of day does: the manual lists it without explaining it.
Good seeds to try: the official pages do not share any. A seed gives you the same map again only with the same climate and map settings.
Which economy the Industries setting starts on.
Frequently asked questions
Can you change the weather in Transport Fever 3?
Yes. Dynamic changes the weather at random. You can also fix it to Sunny, Cloudy, or Rainy, when you set up the map or later with the date controls; the Weatherman achievement asks you to do exactly that.
How do you turn off night in Transport Fever 3?
Set the time of day to Day, one of its fixed choices, in the Environment section when you set up the map. In a running game, the date controls in the bottom right corner change it too. Dynamic and Continuous both move the light through the day.
Does the weather slow Transport Fever 3 down?
Two players say the weather, and the changing light of sunsets and the day-night cycle, cost a lot of frame rate, and suggest fixing them: one set a fixed sunny day and got a steady 60 to 75 FPS at 4K, where rain used to bring big drops. These are player reports, not official advice.
How do seeds work in Transport Fever 3?
The seed is the key for the random map generator: the same seed with the same settings creates the same map again. The seed sits in the World section of the map settings, next to Map Size and Map Format.
Which climate should you pick?
The climate decides how the map looks and what its land is like. It does not change the simulation directly, but the land itself makes some kinds of transport more useful than others. The industry table in the manual differs too: only Subarctic has the Paper Mill and Printing Press, and only Tropical has the Rubber Farm and Tire Factory.
What does the difficulty setting change?
The Difficulty level at the top of the Gameplay Settings tab fills in every setting below it with that level's preset values. After that you can still change single settings. That covers the economy, town rating, finance and advanced settings.
Do custom settings turn off achievements?
They can. Achievements are generally unavailable while non-cosmetic mods are active or when gameplay settings differ from the standard values.
Can you change the settings after starting a game?
For a game you already saved, open Load Game and use the settings icon on its card. If the save allows it, you can change its gameplay settings and its list of mods there. Weather, time of day and calendar speed can be changed at any time with the date controls in the bottom right corner.
Sources
Everything on this page comes from the official manual and the official press kit: